What's New

Instagram

About Me

Photo Profile
Meetanshi Architecture Designer

Meetanshi is found based on providing the best Magento Extensions and Customized eCommerce Business Solutions perfected to the users’ needs. Our Happy users make us Happy. Complete satisfaction to our clients is what drives and motivates us to work hard. Read More

Monday, May 5, 2025

Step-by-Step Guide: Integrating Product Attributes into Magento 2 Shipment Emails

 Enhancing shipment emails with specific product attributes can provide customers with more detailed information about their orders. Magento 2 doesn't offer a built-in feature for this, but with some custom coding, you can achieve this functionality.


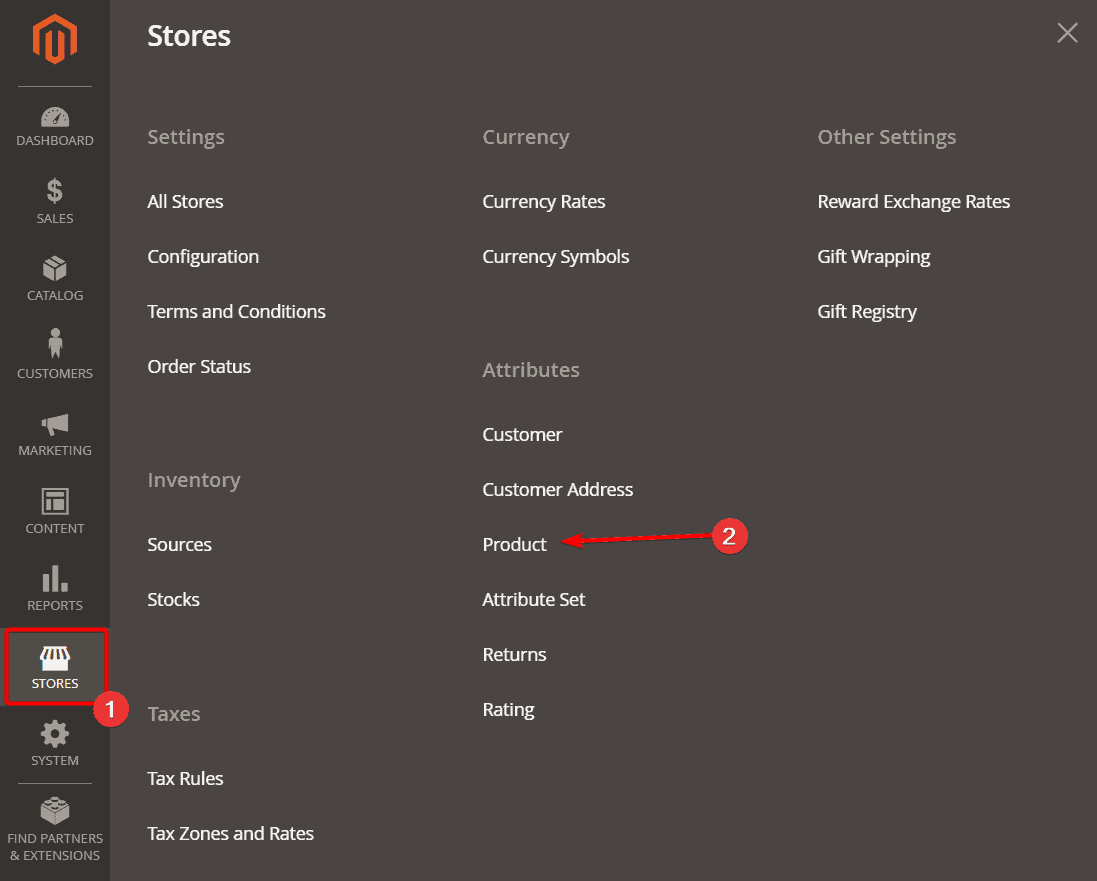
Step 1: Identify the Product Attribute Code


Access your Magento 2 Admin Panel and navigate to Stores > Attributes > Product.

Locate the desired attribute and note its Attribute Code for later use.


Step 2: Customize the Shipment Email Template


Magento 2's default shipment email template doesn't display custom product attributes.

To include them, you'll need to modify the appropriate email template file.


Step 3: Retrieve the Product Attribute Value


Within the email template, fetch the product attribute value using the attribute code.

Ensure the attribute is correctly retrieved and formatted for display.


Step 4: Insert the Attribute into the Email Content


Place the retrieved attribute value in the desired location within the email template.

This could be alongside product details like name, SKU, or price.


Step 5: Deploy and Test the Changes


After saving your modifications, clear the Magento cache to apply changes.

Send a test shipment email to verify the attribute appears as intended.


By following these steps, you can enhance your Magento 2 shipment emails with additional product information, providing a more informative experience for your customers.


For detailed blog :https://meetanshi.com/blog/add-product-attributes-in-shipment-emails-template-in-magento-2/

Sunday, May 4, 2025

Best AI for Content Creators: ChatGPT vs. Bard vs. Bing

 In the era of AI-powered productivity, content creators are turning to advanced tools like ChatGPT, Google Bard, and Microsoft Bing Chat to supercharge their writing, research, and ideation workflows. But which AI assistant truly serves content creators best


ChatGPT is developed by OpenAI and has become one of the most popular AI tools for content creation. It is known for its strong conversational ability and creativity in writing tasks. ChatGPT is accessible via web and mobile, and its premium version, ChatGPT Plus, gives users access to GPT-4 Turbo. It also includes powerful features like custom GPTs, plugins, and a built-in code interpreter, making it a versatile tool for a wide range of content creation needs.


Google Bard is powered by Google's Gemini model and is designed to integrate seamlessly with Google’s suite of tools like Gmail, Google Docs, and Google Drive. Bard is particularly strong when it comes to retrieving real-time information from the internet. This makes it a useful companion for fact-checking, trend research, and generating ideas based on current events or data.


Microsoft Bing Chat is built on GPT-4 technology and is embedded within the Microsoft Edge browser. It also integrates well with Microsoft 365 products, providing convenience for users already in the Microsoft ecosystem. Bing Chat is especially helpful for quick research and summaries, often providing cited sources and links to web content, which makes it valuable for writers who rely on web-based facts and references.


Conclusion:


For content creators prioritizing high-quality, creative, and coherent content, ChatGPT is the preferred AI assistant in 2025. Its robust features and superior content generation capabilities make it a valuable tool for various content creation endeavors.


For detailed blog :https://meetanshi.com/blog/chatgpt-vs-bard-vs-bing/

Friday, May 2, 2025

Best WordPress SEO Practices to Drive More Organic Traffic

Ranking high in search results isn’t just about luck — it’s about having the right SEO practices in place. If you run a WordPress site, you already have a powerful foundation for search engine optimization. But to truly stand out and drive meaningful, organic traffic, you need to implement key strategies that go beyond basic plugin installation.


Choose an SEO-Friendly WordPress Theme

Use a lightweight, responsive theme built with clean code and Schema markup.

It improves site speed, accessibility, and search engine crawlability.


Use a Powerful SEO Plugin

Install plugins like Yoast, Rank Math, or AIOSEO for better on-page optimization.

They handle titles, meta descriptions, sitemaps, and much more.


Optimize Your Permalink Structure

Use clean, keyword-rich URLs like /seo-tips-wordpress instead of ?p=123.

It improves readability and helps search engines understand your content.


Do Keyword Research Before Publishing

Find high-intent keywords with tools like Ahrefs or Ubersuggest.

Naturally include them in your content, titles, and meta data.


Write High-Quality, Intent-Driven Content

Focus on solving user problems and answering search intent clearly.

Use proper formatting and update content regularly for relevance.


Improve Site Speed for SEO & UX

Compress images, use caching, and opt for fast hosting.

A faster site leads to better rankings and user satisfaction.


WordPress gives you a solid SEO foundation, but ranking in Google takes more than publishing content. By applying these 10 best practices — from theme selection and keyword targeting to speed optimization and internal linking — you’ll significantly improve your organic visibility and grow sustainable traffic over time.


For detailed blog:https://meetanshi.com/blog/best-seo-tips-for-wordpresss/

How to Win Seasonal Traffic: SEO Tips for Sales & Pop-Up Campaigns

 Seasonal sales, recurring e-commerce events, and pop-up campaigns can be traffic goldmines—if you play your SEO cards right. Many merchants focus on paid ads during these periods and neglect the organic potential. The truth? With the right SEO tactics, your event pages can drive traffic not just now, but year after year.


Why Seasonal SEO Matters:
Seasonal SEO is essential because it helps e-commerce businesses capitalize on predictable spikes in search traffic during specific times of the year—like Black Friday, Cyber Monday, summer sales, or holiday shopping periods. Instead of relying solely on paid ads, which can be expensive and short-lived, a well-executed seasonal SEO strategy allows your site to rank organically for high-intent keywords when customer demand is at its peak. This not only drives consistent, qualified traffic to your campaign pages but also builds long-term visibility and domain authority. By optimizing early and maintaining evergreen content for recurring events, you can turn one-time campaigns into annual traffic and revenue generators.


Seasonal SEO isn’t just a “nice to have”—it’s a growth lever for merchants who want to maximize organic ROI from every major campaign. By laying the groundwork early and keeping your content evergreen, you can dominate search rankings not just once, but every year.


For detailed blog :https://meetanshi.com/blog/seo-strategy-for-recurring-e-commerce-events-seasonal-sales-pop-store/

Thursday, May 1, 2025

Shopify Facebook Integration: Easy Setup & 6 Tips to Maximize Sales

 Selling on Facebook is no longer optional—it’s essential. With over 2 billion monthly active users, Facebook gives your Shopify store an opportunity to be seen, clicked, and bought from—right where your customers spend their time. In this guide, you'll learn how to set up Shopify’s Facebook integration the right way and 6 powerful tips to help you maximize sales through Facebook Shop.


How to Set Up Shopify Facebook Integration


To set up Shopify Facebook integration, start by installing the Facebook & Instagram by Meta app from the Shopify App Store. In your Shopify admin, go to Settings > Apps and sales channels, then click “Shopify App Store” and search for the app. Once you install it, log in with your Facebook account credentials and grant Shopify the necessary permissions to access your Facebook Business Manager, Facebook Page, and Commerce Account. Next, connect your store to your Business Manager and link your Facebook Shop (and Instagram account if applicable). Shopify will then sync your products automatically with Facebook’s product catalogue. Ensure your products follow Facebook’s Commerce Policies to avoid rejection. 


Integrating Shopify with Facebook Shop gives you access to a massive new audience without the hassle of managing separate inventories or platforms. When set up correctly and optimised with the right tactics, this integration becomes a powerful sales channel that drives discovery, boosts engagement, and increases conversions.


For detailed blog :https://meetanshi.com/blog/avoid-spam-emails-in-magento/

Wednesday, April 30, 2025

How to Improve Magento Email Deliverability

 Are your Magento store emails ending up in your customers’ spam folders instead of their inboxes? You're not alone. Email deliverability is a common challenge that can affect order confirmations, password resets, marketing emails, and more. Poor email deliverability can lead to customer frustration, lost sales, and brand distrust.


What is Email Deliverability?

Email deliverability refers to the ability of your email messages to successfully reach recipients' inboxes rather than being filtered into spam or rejected entirely. It goes beyond just sending emails—it involves ensuring that messages are accepted by the receiving mail server and then placed in the inbox, not in the junk or promotions folder. Deliverability is influenced by several factors, including the sender's domain reputation, email content quality, authentication records like SPF, DKIM, and DMARC, and the use of reliable SMTP servers. 


Delivering emails successfully in Magento isn’t just about hitting “send.” It involves infrastructure, authentication, content optimization, and monitoring. By implementing the steps above, you’ll not only improve Magento email deliverability but also build a strong, professional communication system that customers trust.


Conclusion

Improving email deliverability in Magento is a combination of technical setup, best practices, and regular monitoring. With the right configuration and content hygiene, your emails can reliably reach your customers and improve the overall user experience.


For detailed blog :https://meetanshi.com/blog/avoid-spam-emails-in-magento/


Monday, April 28, 2025

Magento 2 Reset Button in Grid Not Working? Here’s How to Fix It

 The Magento 2 admin panel offers a powerful UI component grid to manage products, customers, orders, and more. A handy feature within this grid is the “Reset” button, used to clear all applied filters and restore the default view. But what if the reset button suddenly stops working


How to Fix the Magento 2 Grid Reset Button Not Working


In Magento 2, the admin grid's Reset button is meant to quickly clear filters and refresh the data view. However, if the reset button stops working, it’s usually due to JavaScript errors, module conflicts, or outdated static files. The first step is to open your browser’s console and check for any JavaScript errors when clicking the Reset button. If errors appear, try disabling custom modules to find the conflict.


Switching Magento to developer mode helps you catch more detailed error logs. If the issue persists, test using the default Luma theme or a fresh Magento installation to rule out deeper theme or module problems. Lastly, using your browser’s Network tab can reveal if AJAX requests fail when clicking Reset, giving you more clues to fix the problem.


The Magento 2 admin grid reset button is essential for quick navigation and filtering. If it's not working, don’t panic—it’s usually fixable by addressing layout issues, JS conflicts, or cache problems.


REFERENCE:

How to Refresh Checkout Summary After Shipping Method Change in Magento 2


Magento 2 offers a flexible and dynamic checkout experience, but sometimes, when a customer selects a shipping method, the checkout summary — especially totals like

shipping cost, taxes, and grand total — doesn’t update automatically.


Why the Checkout Summary Might Not Update?


By default, Magento 2 should automatically refresh the checkout totals after a customer selects a different shipping method. However, in some cases, this automatic update might not work as expected. This typically happens if there is custom code affecting the checkout flow, certain third-party extensions interfering with the default behavior, or JavaScript components failing to trigger the correct events. As a result, the checkout summary — including shipping costs, taxes, and the grand total — may not update properly, leading to a confusing customer experience. In such situations, manually triggering the update becomes necessary to ensure the checkout page reflects the correct order totals.


If your Magento 2 checkout summary doesn’t refresh after selecting a shipping method, it’s often due to missing event handling or JavaScript issues.

By correctly observing the shipping method changes and forcing a totals refresh, you can ensure a seamless checkout flow for your customers.


For detailed blog :https://meetanshi.com/blog/update-checkout-summary-on-selecting-shipping-method-in-magento-2/


Get more of our update !